Starting your hydroponics journey might feel like stepping into unknown territory, but with the right guidance, it’s an exciting and accessible adventure. Building a DIY Hydroponic System allows you to grow fresh herbs, crisp lettuce, or juicy strawberries in your kitchen, balcony, or any small space—all without soil!
This innovative growing method lets you take control of your food production, embrace sustainable practices, and enjoy the thrill of harvesting homegrown produce year-round. With just a little effort and some basic materials, you can create a system that’s efficient, budget-friendly, and tailored to your space. Hydroponics has never been easier or more rewarding to start!
This guide will walk you through creating a simple, budget-friendly system that’s perfect for beginners. You’ll learn the essentials, from assembling your setup to maintaining nutrient levels, ensuring your plants thrive in their soilless environment. Whether you’re looking to save on grocery costs, embrace sustainable living, or simply explore a fascinating hobby, a DIY Hydroponic System is your ticket to transforming your home into a lush, green oasis. Let’s get started!

Materials You’ll Need
| Item | Purpose | Where to Get It |
|---|---|---|
| Plastic container | Holds the nutrient solution | Local hardware store or Amazon |
| Net pots | Secures plants in the system | Gardening stores or online retailers |
| Growing medium | Supports roots (e.g., clay pellets) | Hydroponics suppliers |
| Air pump and air stone | Oxygenates the nutrient solution | Pet stores (aquarium section) |
| Hydroponic nutrients | Provides essential minerals for plant growth | Hydroponics or gardening stores |
| pH testing kit | Monitors solution acidity/alkalinity | Online or gardening centers |
| Seedlings/seeds | Your future plants | Any local nursery or seed supplier |
Pro Tip:
If you’re on a budget, repurpose items like plastic bottles or jars for your first build.
Step 1: Choose Your Location
DIY Hydroponic Systems perform best in environments that provide consistent lighting, stable temperatures, and proper airflow. When selecting a location for your setup, keep these key factors in mind to ensure your plants flourish:
- Lighting: Light is the lifeblood of any hydroponic system. Ideally, place your system in a location with access to ample natural sunlight, such as near a south-facing window. If natural light is limited, invest in quality grow lights that provide the specific wavelengths your plants need for different growth stages.
- Temperature Control: Consistent temperatures are crucial for plant health. Most plants thrive in a range of 65–75°F (18–24°C). Choose a space that avoids extreme fluctuations caused by drafts, heating vents, or direct exposure to cooling devices.
- Accessibility: Make sure the location is easy to reach for regular maintenance tasks like checking water levels, adjusting nutrient solutions, pruning, and harvesting. A convenient setup makes it easier to stay on top of plant care.
- Ventilation: Good airflow helps prevent problems like mold, mildew, and pests while also promoting healthy plant growth. An area with natural ventilation or the addition of a small fan can work wonders for your hydroponic system.
- Water Access: Proximity to a water source is essential for filling and maintaining your nutrient reservoir. Choose a spot where you can easily access clean, fresh water for your system.
- Space Considerations: Depending on the size and type of system, ensure you have enough room for the setup, including space for plant growth and potential expansion as you gain experience.
By taking these factors into account, you’ll create the ideal environment for your DIY Hydroponic System to thrive, ensuring robust and productive plants in your indoor garden.
Pro Tip:
Grow lights with blue and red spectrums promote healthy plant growth and are worth investing in for darker spaces.
The container is a crucial part of your DIY Hydroponic System, as it holds the nutrient solution and provides stability for your plants. Follow these steps to get it ready:
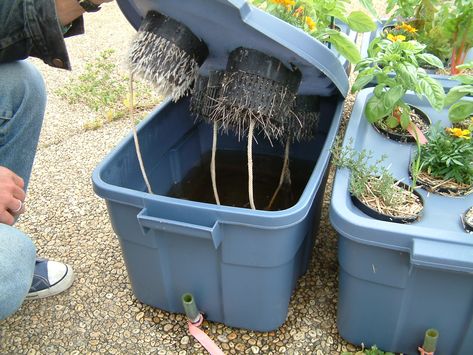
- Choose the Right Container: Select a sturdy plastic bin or bucket that blocks out light. Dark-colored containers are ideal, as they naturally prevent light from penetrating and encourage a clean growing environment.
- Drill Holes for Net Pots: Using a hole saw, drill evenly spaced holes in the lid of your container. Make sure the holes are just large enough to securely hold your net pots without them falling through. Spacing the holes evenly allows plants to grow without competing for light or nutrients.
- Lightproof the Container: If your container is transparent or lets in light, cover it with duct tape or spray paint it with non-toxic paint. This step is essential to prevent algae growth, which thrives in light and can harm your plants by competing for nutrients.
- Bonus Tip: Line the edges of the drilled holes with rubber grommets or adhesive foam strips to prevent wear and tear on your net pots. This small adjustment can extend the lifespan of your system and keep everything securely in place.
With your container properly prepared, you’re one step closer to building an efficient and functional hydroponic system!
Keep the container size manageable—start small to experiment before scaling up.
Step 3: Set Up the Air System
- Position the air stone at the bottom of the container.
- Attach it to the air pump using the tubing. Ensure the tubing exits through a small hole in the lid.
- Test the pump to verify bubbles circulate evenly throughout the container.
Why This Matters:
Oxygen-rich water prevents root rot and supports plant health.

Step 4: Prepare and Add the Nutrient Solution
- Fill the container with water, leaving about 2–3 inches at the top.
- Add hydroponic nutrients following the product’s instructions. Overfeeding can harm plants.
- Test and adjust the pH to stay between 5.5 and 6.5 using a pH kit. Add pH adjusters (“up” or “down”) as needed.
Pro Tip:
Keep a notebook to track nutrient changes and pH adjustments for consistent results.
Step 5: Set Up the Plants
- Fill the net pots with a growing medium like clay pebbles or rock wool.
- Place the seedlings or germinated seeds into the medium.
- Ensure the roots dangle slightly into the nutrient solution.
Step 6: Assemble and Maintain the System
- Insert the net pots into the holes you drilled earlier.
- Check the water level daily and top off as necessary.
- Replace the nutrient solution every 2–3 weeks to prevent salt buildup.
Maintenance Checklist:
- Daily: Check water level and bubbling activity.
- Weekly: Clean any visible debris or algae.
- Biweekly: Flush and replace the solution.
Bonus: Tips for Faster Growth and Healthier Plants
- Rotate Plants: Turn the pots every few days for even light exposure.
- Watch for Pests: Even indoors, bugs can sneak in. Neem oil is a natural deterrent.
- Keep Notes: Record plant growth, nutrient ratios, and any changes. Over time, this creates a playbook for your specific setup.
FAQs for Beginners
Q: What are the easiest plants to grow hydroponically?
A: Start with leafy greens like lettuce, spinach, or herbs like basil and mint. They’re fast-growing and forgiving for beginners.
Q: How much does it cost to set up a basic system?
A: A simple DIY system can cost between $50–$100, depending on the materials you already have.
Q: How soon can I expect results?
A: Most leafy greens mature in 4–6 weeks. Herbs take a little longer but can be harvested continuously.
Conclusion
Congratulations—you’ve built your very own DIY Hydroponic System! With regular care, attention, and a bit of patience, you’ll soon be enjoying fresh, homegrown produce year-round. Embrace the journey by experimenting with different plants, techniques, and setups to see what works best for you. And don’t forget to share your progress and tips with fellow hydroponics enthusiasts—because growth is always better when it’s shared!
Next Steps:
Check out our guide on Best Plants for Hydroponics or explore Advanced Hydroponic Techniques for Small Spaces.


